
Gen AI Made Simple: Building an AI Agent That Converts Alteryx Workflows to Databricks SQL
A practical walkthrough of using LangGraph, OpenAI, DuckDB(for experimentation) to automate one of the most tedious parts of a Databricks Migration
The Problem:
If you have ever been part of a Databricks migration project, you have probably sat in front of an Alteryx workflow that someone spent weeks building and thought, "How do I turn this into Databricks SQL?"
Alteryx workflows are visual. A filter here, a sort there, a macro that no one remembers writing. Translating them to SQL is slow and error-prone. Today, we look at building an AI agent that can help solve this problem using LangGraph framework.
Why LangGraph?
The simplest approach would have been a single long Python function: parse the XML, build a prompt, call the LLM, write the file. Under 50 lines. It worked for clean, simple workflows and fell apart the moment the LLM returned something slightly unexpected. There was no way to retry a single step, no way to add logic without touching everything, and debugging meant reading one giant function top to bottom.
LangChain was the next obvious one. But LangChain pipelines are fundamentally linear. You cannot branch. You cannot loop back. If step four fails, you restart from step one.
LangGraph solved both problems by separating three things that the other approaches cannot:
State from Logic: Every node is a pure function. It reads from a shared state dictionary, does its work, and returns only the fields it changed. The graph owns the state, not the functions. That is what makes LangGraph a stateful graph: the state persists across every node, survives conditional branches, and can be inspected or resumed at any point. If something goes wrong, you know exactly what the previous node produced. No mystery, no global variables, no side effects hidden three functions deep.
Flow from execution. The nodes, the edges, and the conditional branches are declared separately from the node functions themselves. You can read the graph definition and understand the entire control flow without tracing through any business logic. Adding a new step means adding a node and wiring it in; nothing else changes.
Retry from failure, not from scratch. Because the state is explicit and the graph is declared independently, you can re-enter at any node. If SQL validation fails, you loop back only to the translation node with the error appended to the state, not back to the XML parser, not back to the start. In a migration context, this matters because workflows don't arrive one at a time, and a single failure should not cost you the whole batch.
The Architecture:
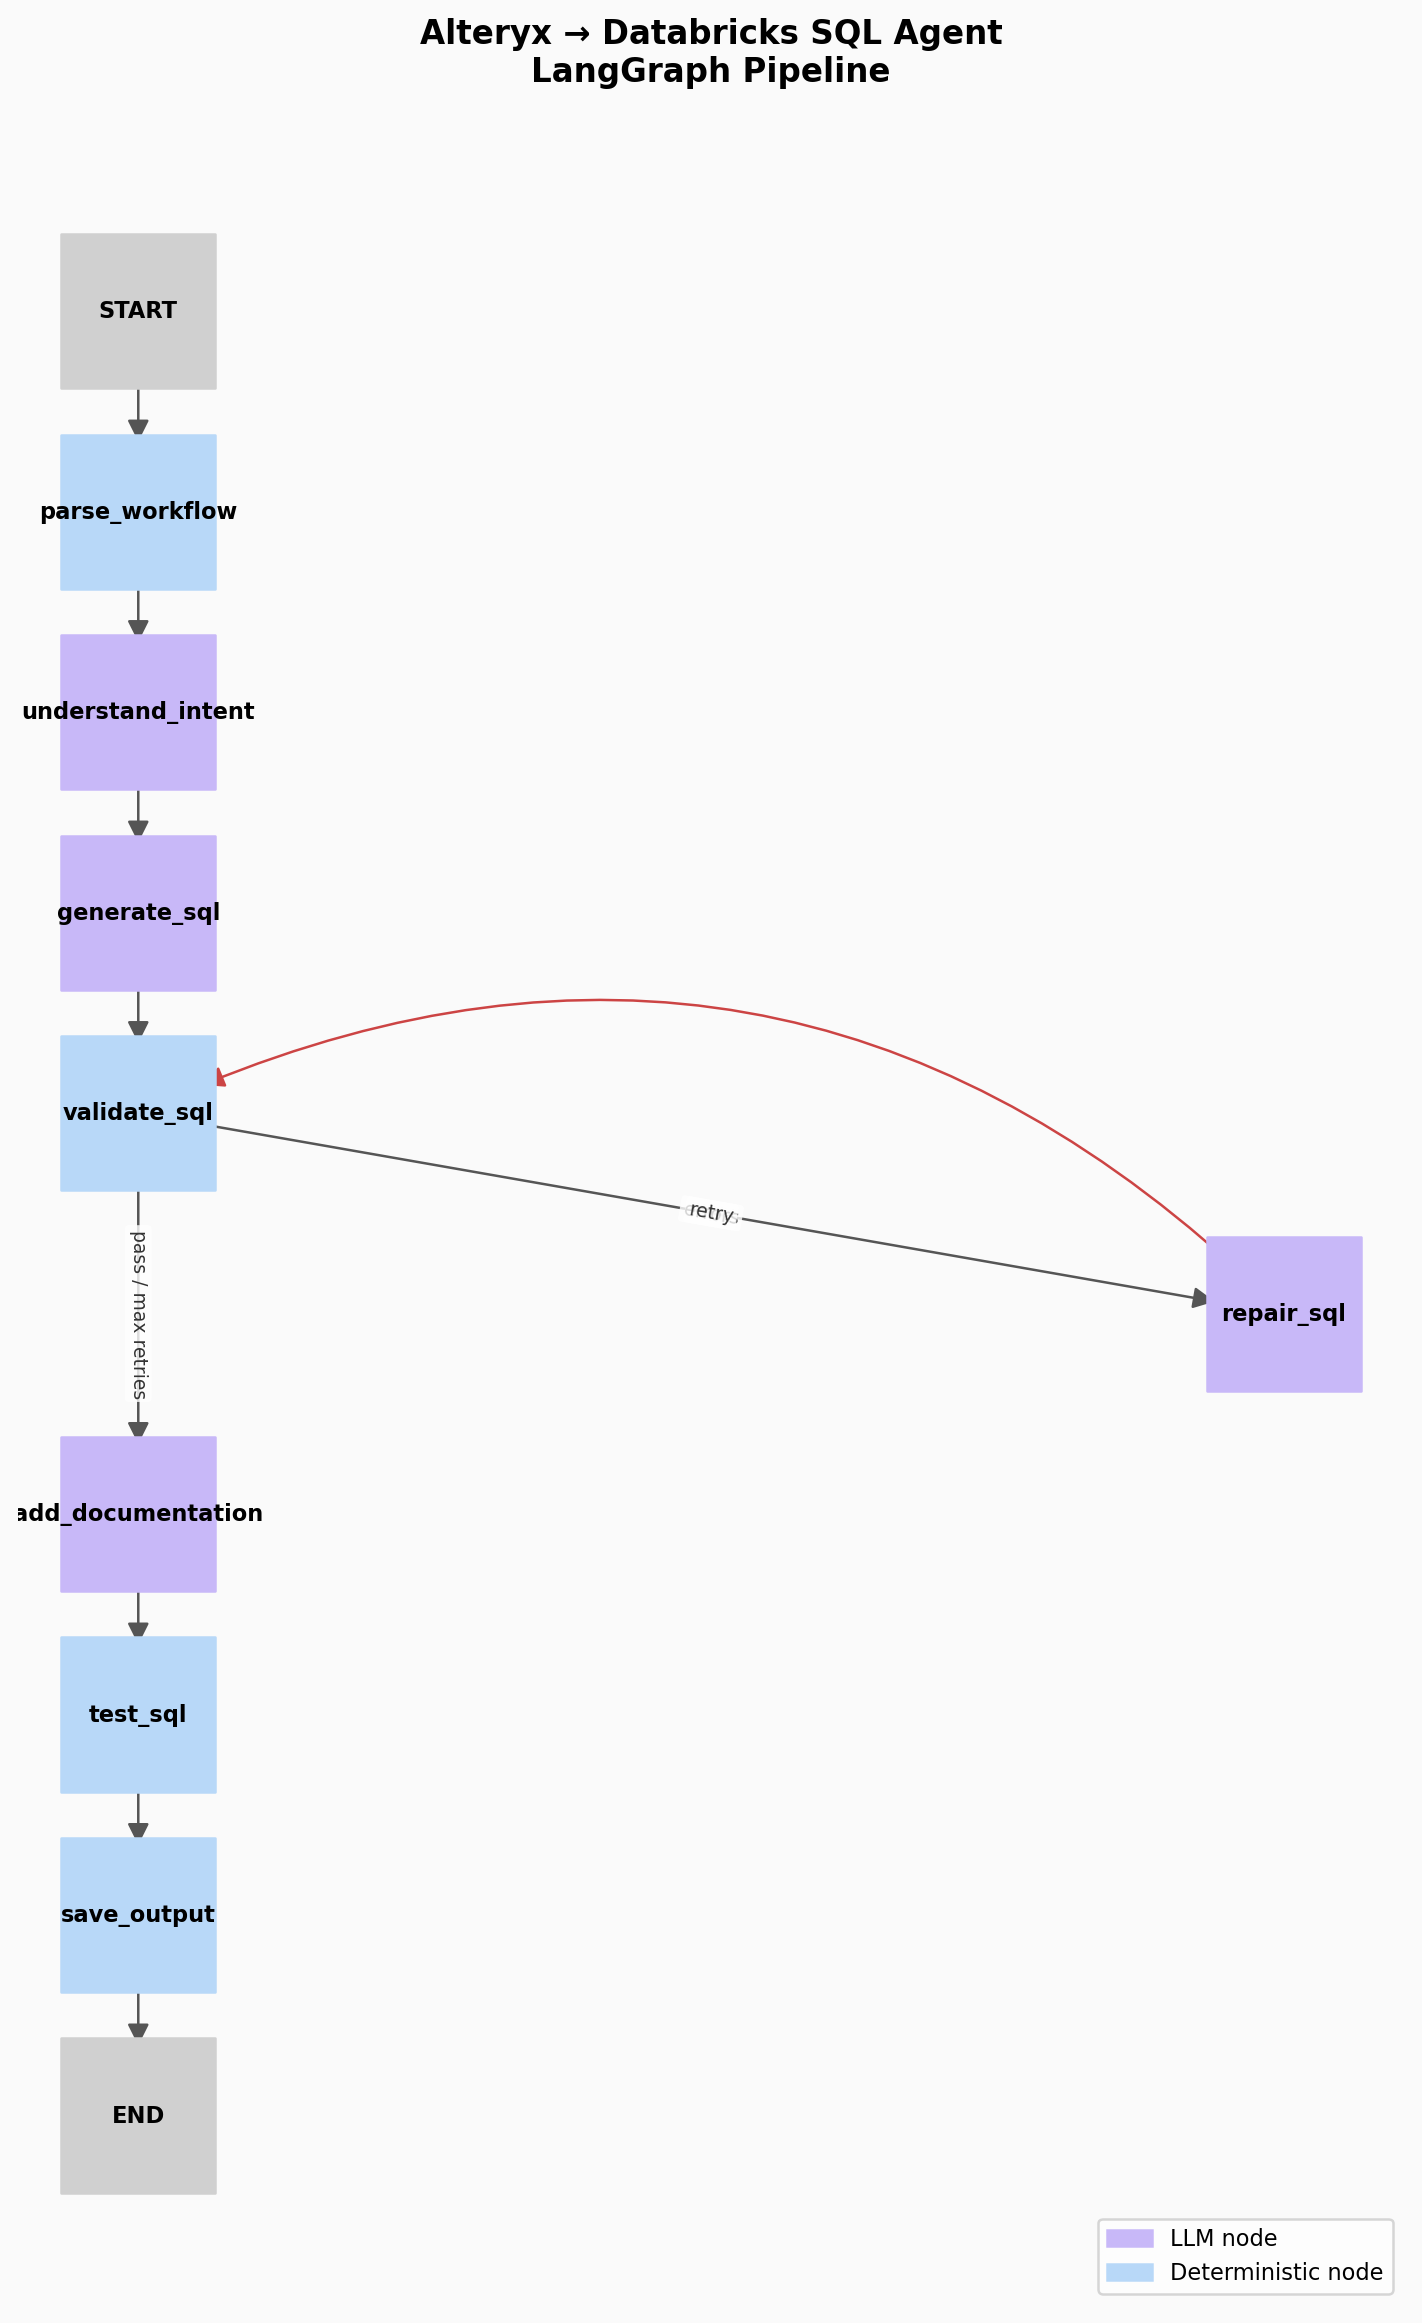
The agent is a sequential graph with one conditional loop. The happy path runs straight through from start to finish. The only branching happens at validate_sql: pass and the graph continues forward, fail and it routes to repair_sql and back, up to three times before giving up and routing to a review queue.
parse_workflow → understand_intent → generate_sql → validate_sql → add_documentation → test_sql → save_sql
With the repair loop made explicit:
validate_sql → (fail) → repair_sql → validate_sql → (fail, retry 2) → repair_sql → validate_sql → (fail, retry 3) → review queue validate_sql → (pass) → add_documentation → test_sql → save_sql
Each node runs once, in order, hands its output to the next node through shared state, and is done. The pattern is a sequential + conditional loop. It’s a straight line with one decision point.
The Nodes in Detail:
parse_workflow: This node reads the XML inside the .yxzp archive, extracts every tool and its configuration, and sorts them into execution order using a sorting algorithm. This summary is passed to the LLM. This node also extracts every row from the Text Input tools and stores them separately in the state. This full dataset is used later by the test_sql node
understand_intent: This is the first LLM call; it sends the tool summary to the LLM with a prompt structure. The response becomes the intent field in the state, which is the foundation for SQL generation
generate_sql : This is LLM call 2. It takes the intent+tool summary +any user hints and generates the SQL. The prompt enforces the rules, such as use CTEs+final SELECT only, No CREATE, INSERT or DDL, CTEs named after what they mean, not tool IDs, ORDER BY only on the final SELECT or when paired with LIMIT
validate_sql: This is a pure Python regex check. This is good enough to catch the most common LLM mistakes, but not a substitute for running the SQL in databricks or Duckdb that comes in the test_sql
repair_sql: This is LLM call 3. If validation fails, this sends the broken SQL and the error back to the LLM. It loops back to validate_sql up to 3 times.
add_documentation: Thsi is LLM call 4(or 3 , if repair_sql was not called). This adds the header block comment and also the Comments to the CTEs to understand what the sql /CTE does
test_sql: This is a practical engineering trick in the project. Instead of deploying to Databricks to verify the SQL works, the agent runs it locally in DuckDB(an inprocess SQL engine, that needs no server, no connection, no cloud connection)
save_output: Writes <workflow_name>_databricks.sql to disk with everything appended: the documented SQL, test results and any warnings
The State:
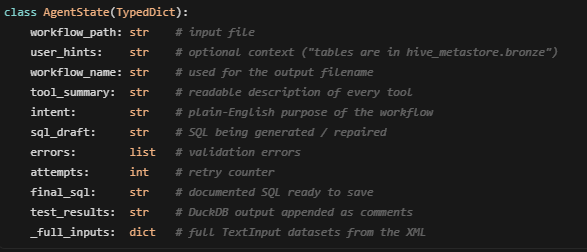
Every node reads from and writes to a single TypedDict.
Each node returns only the fields it changes, LangGraph merges the partial update back to the full state before call the next node.
State is the only way nodes communicate parse_workflow cannot call generate_sql directly. validate_sql cannot call repair_sql directly. They write to state, and LangGraph decides what runs next based on the graph edges. This is what makes the graph re-orderable and testable nodes have no dependencies on each other, only on state fields.
This matters because , you can stop the pipeline at any node and inspect exactly what every previous node produced. If something goes wrong you do not need to re-run the whole pipeline, you can see the exact state at the point of failure. That is the practical value of keeping everything on the whiteboard.
Now, lets upload a DBOC challenge from Alteryx Community Challenge and see how this agent works. I have chosen Challenge_257. I upload this solution of this challenge to the agent, and this parses through each node of the agent and produces a databricks.sql file
This is what happens in brief
Reads the .yxzp, finds 11 Alteryx tools, and understands the workflow finds palindromes from a 678-word list.
Writes the equivalent Databricks SQL using CTEs, validates it, and adds comments.
Tests it locally — gets back 128 | s | 19 (128 palindromes, "s" is the top starting letter).(P.S. this is the test output not real output )
Saves the result as challenge_257_solution_databricks.sql.
Wrapping up:
This should give you an idea of how the LangGraph framework works and why we used it in the first instance to build this kind of an agent.
This works well as a proof of concept and honestly delivers real value right now. For straightforward workflows, it does exactly what you need, end to end, with no manual intervention. For the complex ones, it gets you most of the way there and saves significant time, even if you need to tidy things up at the end.
The limitations are well understood. Complex macros are approximated rather than fully transformed. Workflows with external dependencies or dynamic inputs will need a human to finish what the agent started. Also, this can be enhanced by adding a human-in-the-loop step, where someone reviews the generated SQL before it runs in production.
The foundation handles everyday migration work well, and the path to making it production-ready is clear.
See you in the next session, where we will understand Agent Skills
